The main interface allows you to setup your system and access the different features.
There is also an advanced features that contains more options for seasoned users Augmenta Pleiades (advanced interface)
It is a web interface, which makes it accessible to any machines with a browser (we recommend chrome).
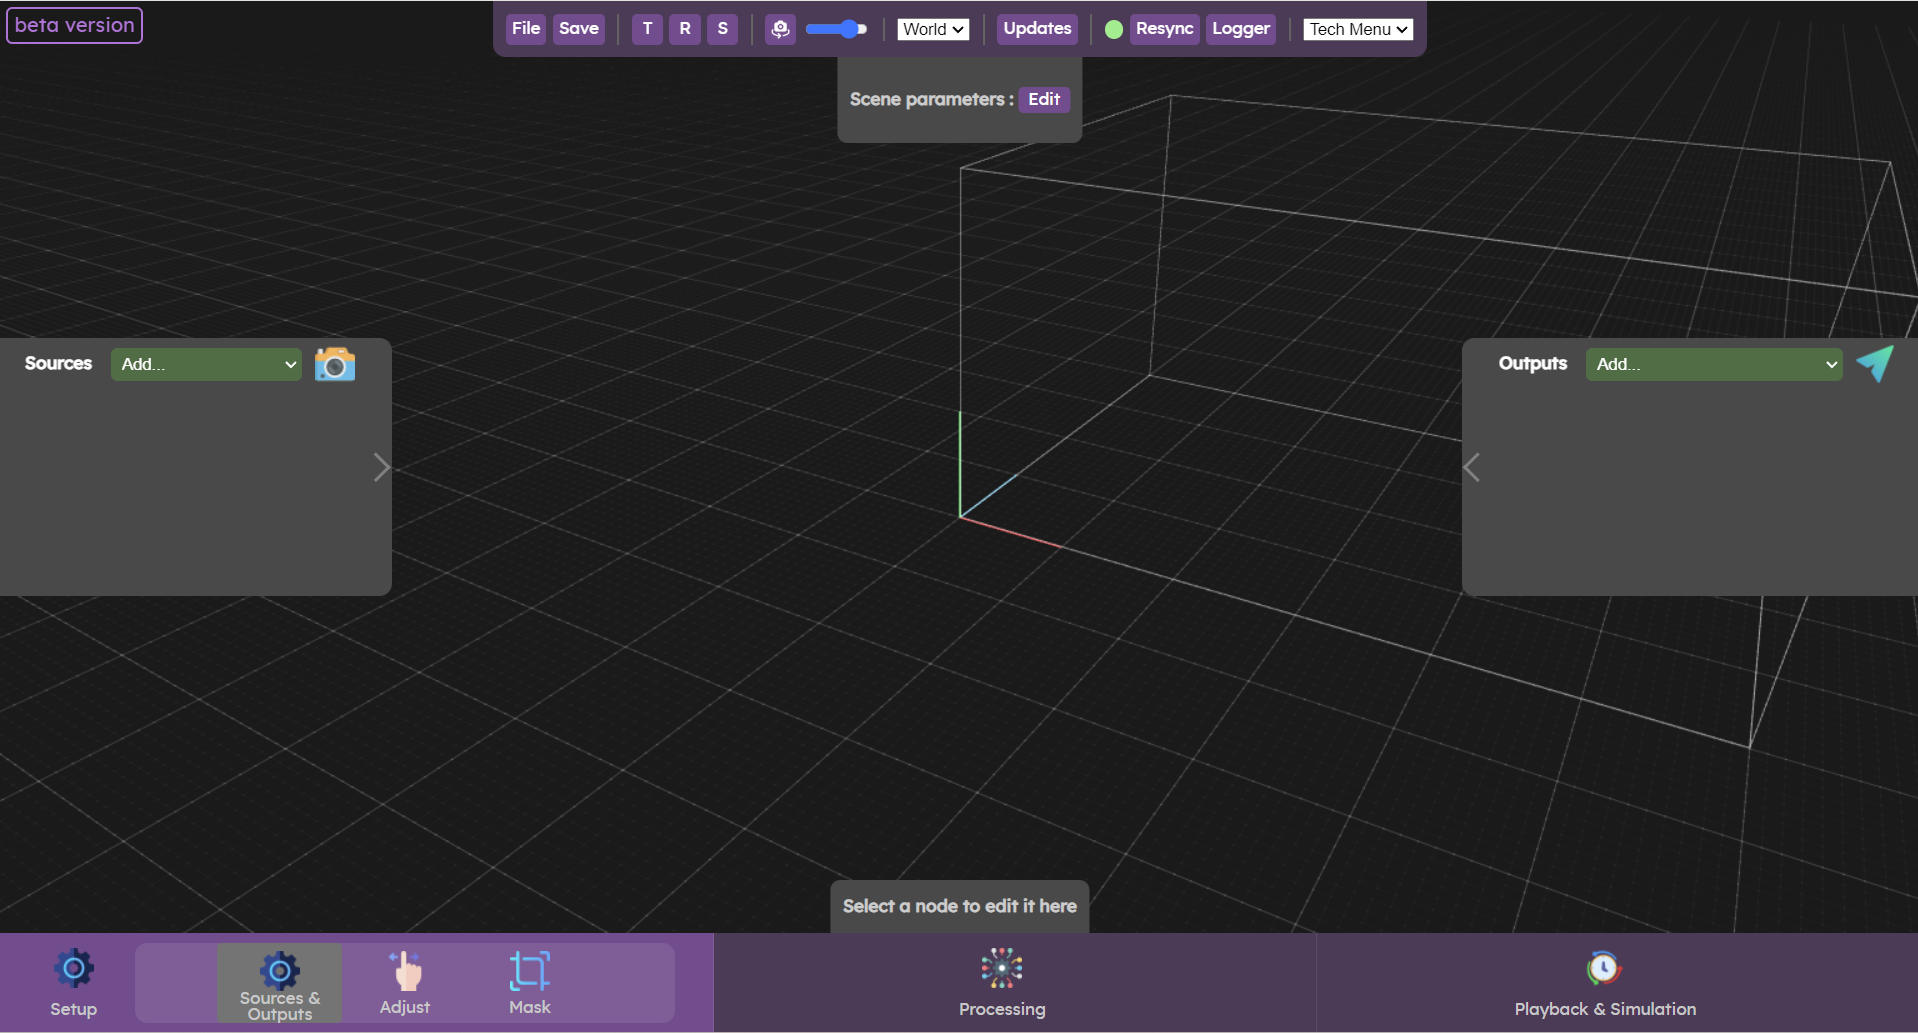
Various panels are available on the Augmenta mainUI. Each panels has a different function.
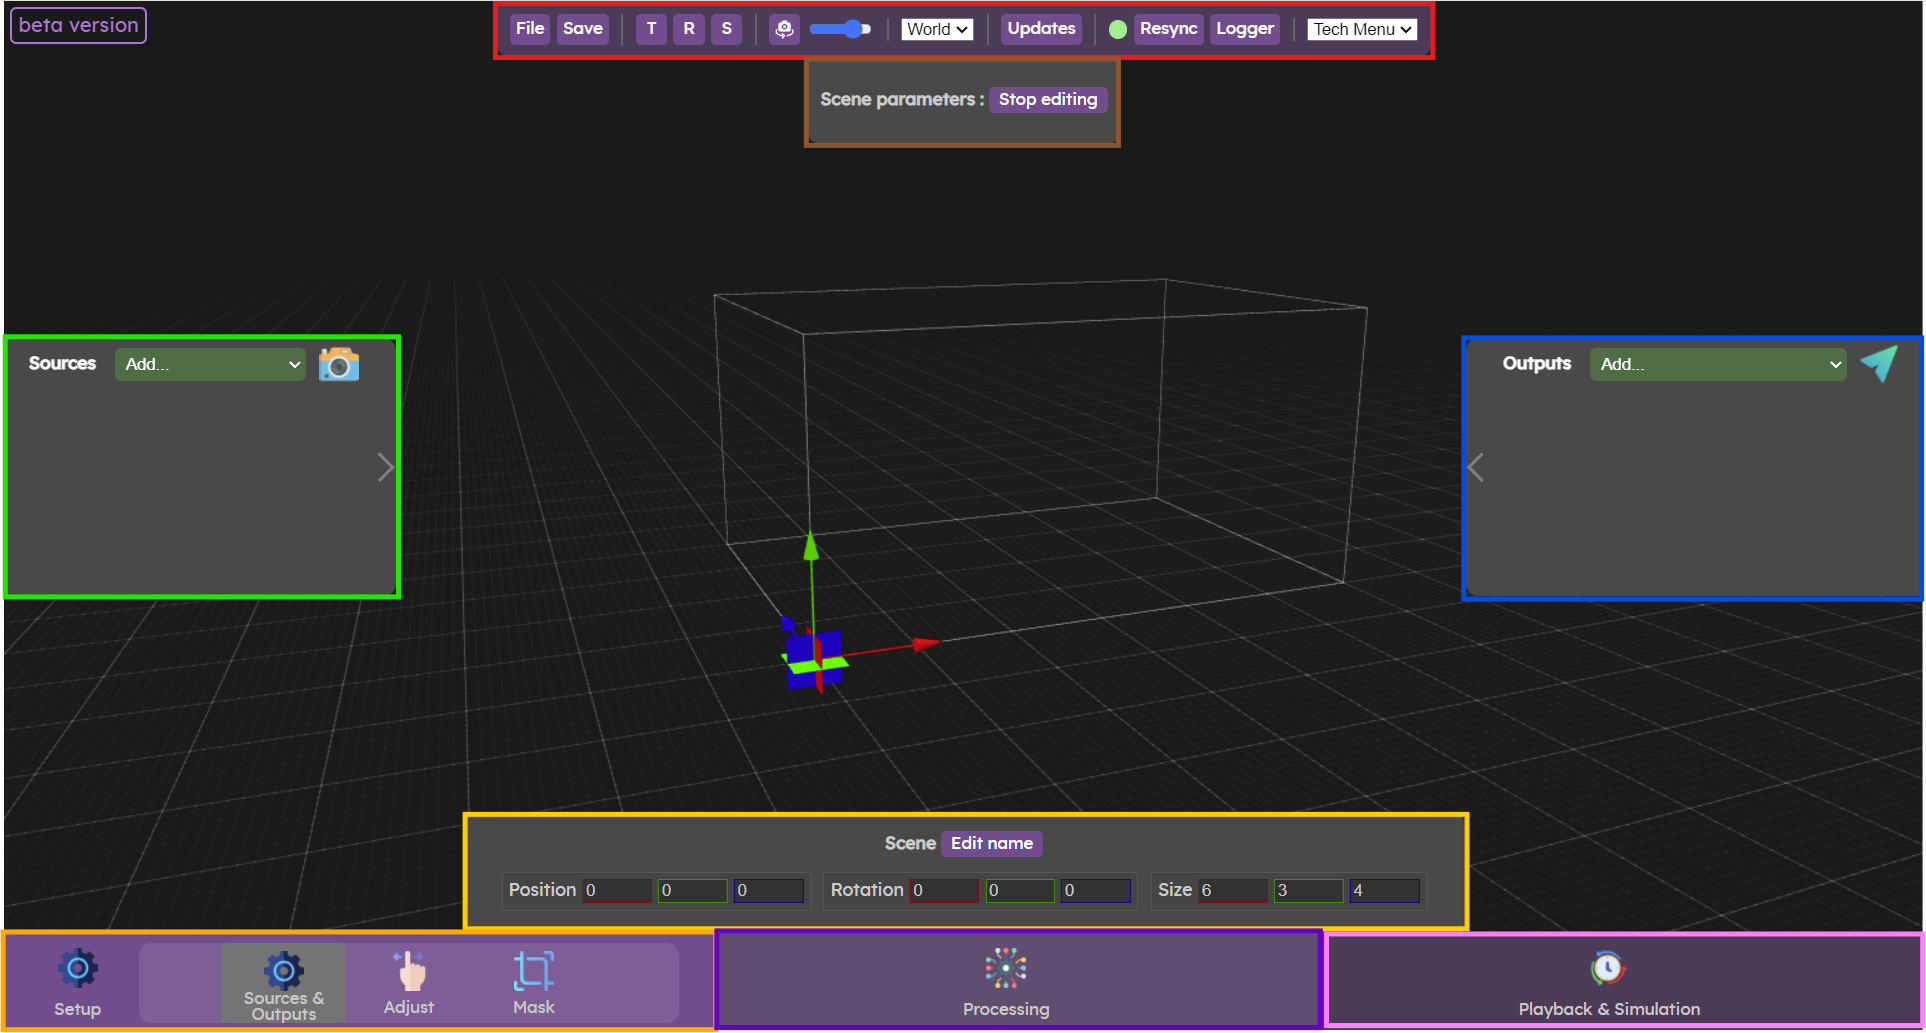
Toolbars of the web interface
The red zone contains app-wide settings. Buttons to manage the currently loaded config files, manipulation options for the 3D editor, display settings and update are in this top bar.
The left, right,bottom, top panels are context menus, they will be populated differently depending on which menu is active.
In the bottom menu bar you will find 3 menu entries:
The orange zone is the setup menu. This menu is used to setup sources, outputs, scene and the position and orientation of cameras before starting the data processing.
The purple zone is the processing menu. In this menu, data is processed to obtain cluster for each person or object.
The pink zone is the playback menu. In this menu, it is possible to replay or record data (cloud or cluster) or simulate clusters in the scene. This makes it possible to generate data without a camera.
Top bar
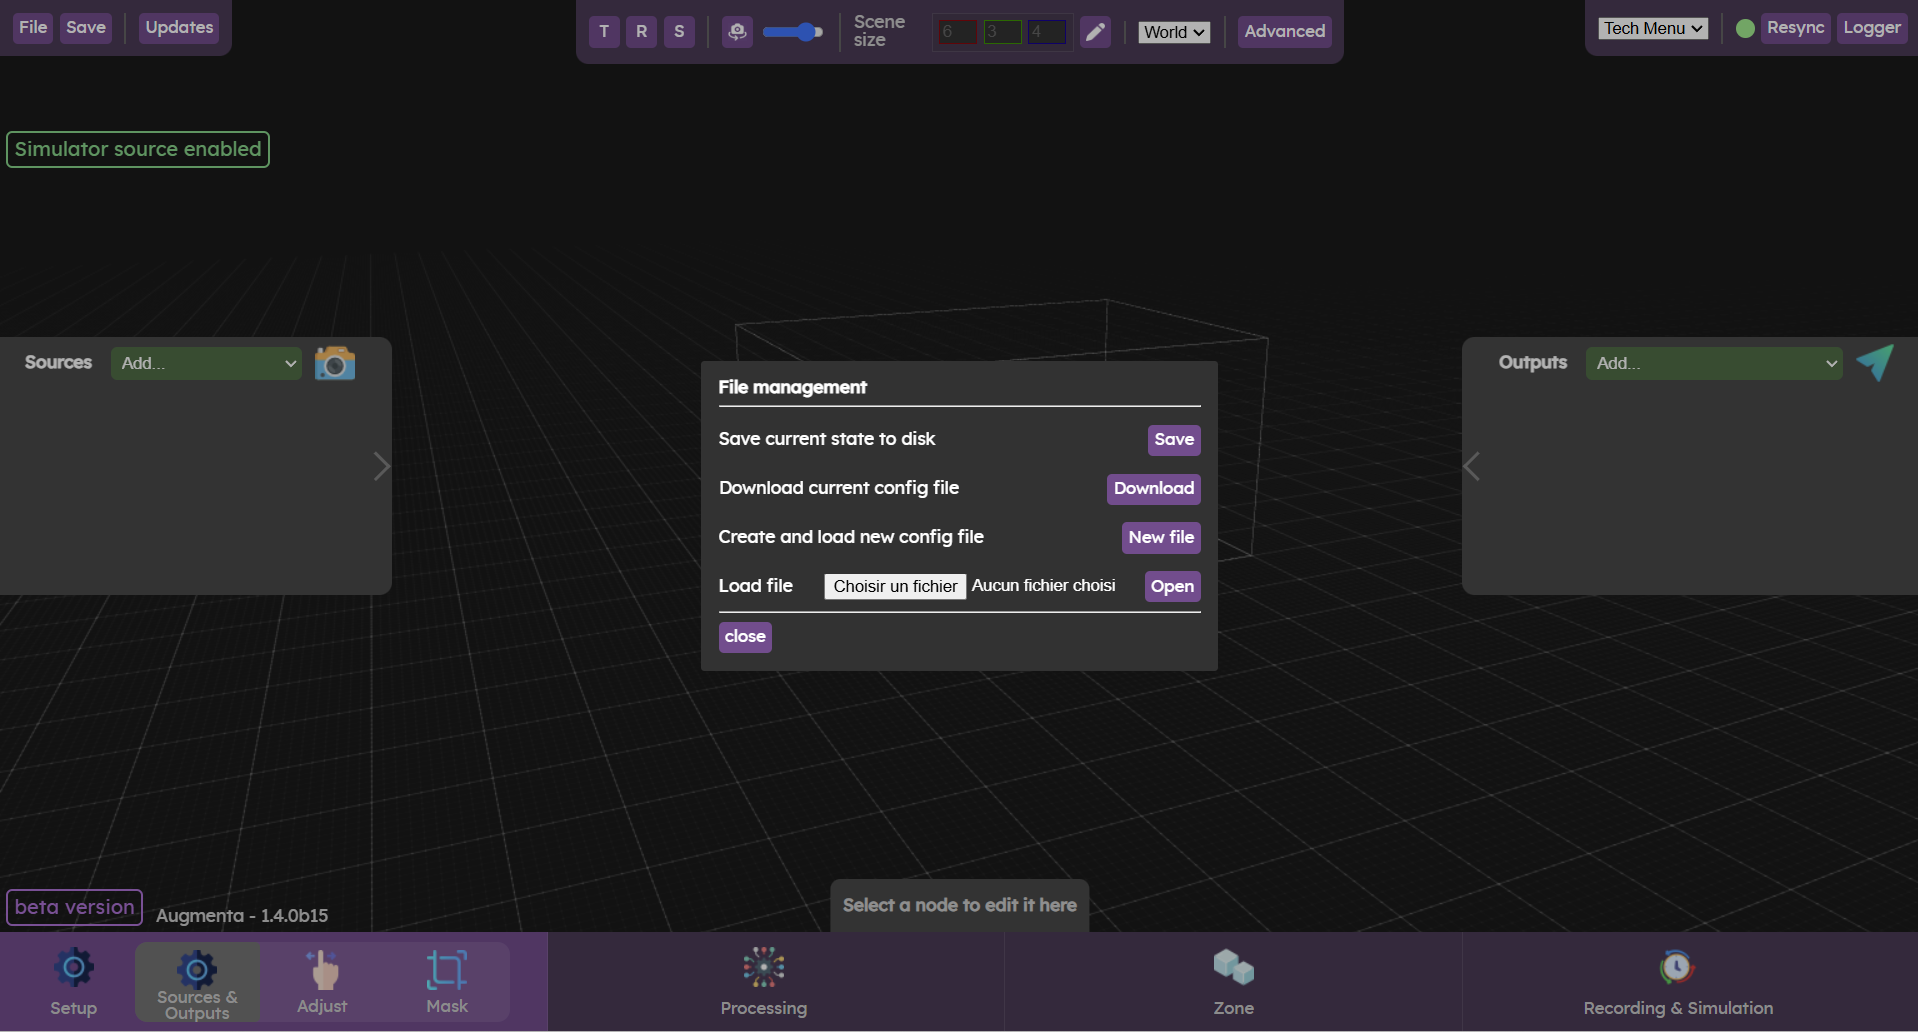
Configuration file management
In the left part of the top bar you will find two buttons to manage files. The file button opens a file manager in which you can save the current state, download the current state as a backup, open a new file or load an existing config.
Save current configuration
Throughout configuration and calibration, you can save the progress of your work by clicking on the "Save" button.
Automatic saves are performed every 5 minutes and stored in a folder that has the same name as the current config file, next to it. If at some point you end up missing some data you can recover your project with those .star files.
Download configuration file
To download your configuration file, click on "Download". A .star file will be downloaded, that containes the latest saved state.
Download a configuration file in the web interface
New File
If you need to return to a file with the initial configuration, you need to load a new blank file.
In the toolbar at the top, click on “File”, then click on “New File” button. A dialog box will ask for confirmation to override your current file.
⚠️
This will override your current file in the project directory. Make sure to download the current config filebefore loading a new one or you could lose your previous config.
Load a configuration file
If you want to replace the current config with an already existing configuration file (.star), you need to load the file.
In the toolbar at the top, click on “File” then click on "Choose file" and select your .star file that will be uploaded. Then click on the "Open" button to load your file.
⚠️
This will override your current file in the project directory. Make sure to download the current config filebefore loading a new one or you could lose your previous config.
Load a configuration file in the web interface
Update menu
Once you've installed Augmenta, there's no need to reinstall it to get updates. Just click on the update button in the top bar. A pop-up window will appear. You'll be able to see the latest stable and beta versions, and whether new updates are available.
Most of the objects in the 3D world have their own transform to place them in the world. Gizmos are visual objects that allow you to change the transform of an object easily.
3 types of gizmos are possible: position, rotation and size gizmo. All objects with a size have all 3 available (e.g. scene, crop box, etc.). Objects with no size, such as cameras, have only the first 2 gizmos available.
Gizmos
There are two ways to make a gizmo appear on an object:
select it in the hierarchy panel (left panel in Setup and Processing menu - except in the Sources & Outputs submenu)
click directly on the object in the 3D world
Make a gizmo appear in the web interface
⚠️
When objects are locked (when the lock icon is red, you can see it in the hierarchy panel), it is not possible to display the gizmo. To be able to move the object with the gizmo, you will have to unlock the object before, by clicking on the lock icon.
Once the object's gizmo is visible, you can switch between the different gizmos:
by clicking on the letters 't', 'r', 's' on your keyboard (for translation, rotation and scale)
or by clicking on 'T', 'R', 'S' buttons in the top toolbar
Switch between the different gizmos in the web interface
There are two possible ways of modifying the transform parameters of an object
Click on an element of the gizmo to move the position, rotation or size, and drag while holding down the mouse button.
You can select it in the hierarchy panel and then modify its position, rotation or size directly in the toolbar parameters.
3D editor camera
In the 3D editor, three orthographic views (each looking at a 2D cutting plan) are available, as well as the standard perspective camera. The 3 orthographic views are very useful for camera calibration, for example, when you need to be very precise on a particular plane.
The standard perspective camera allows you to navigate in the 3D world more naturally.
There are two ways of navigating between the different 2D planes and the 3D world :
by clicking on the camera icon in the top toolbar
by clicking on the "c" key on your keyboard
Views in the web interface
⚠️
2D views are cross-sections of the 3D world. When you're in a 2D view, you can't move around in 3D with the mouse. It is necessary to return to the 3D view
In the 3D world, you can
zoom in and out by scrolling
move in rotation by left-clicking or wheel-clicking
move in translation by right-clicking
In 2D views, you can also
zoom in and out by scrolling
move in translation by right-clicking
In 2D views, left-clicking or wheel-clicking does nothing
Pointcloud opacity
The slider next to the “camera switch” button allows to control the pointcloud opacity.
Scene size viewer
The current scene size is displayed in the top bar. You can also edit the scene parameter (size, position, rotation) by clicking on the “edit” button next to the scene coordinates. This will enable the scene gizmos and have the scene parameters appear in the bottom toolbar for editing.
Scene editing can be done in most menus.
Scene viewer and editor in top bar
World menu
💡
Your current project file can contains multiple worlds which are entirely independent and different configuration.
Project file
World 1
Scene + sensors + outputs
World 2
Scene + sensors + outputs
If you have multiple tracking world, you can navigate between them by selecting them in the top bar
World selection in the web interface
In the advanced interface, you can create, duplicate, and manage your worlds.
Advanced editor settings
The settings in this panel currently control some options relative to the way data is sent to the WebUI:
Use compression for data stream allows to disable data compression to the WebUI. Compressing data before sending to the WebUI allows to display bigger pointclouds. This option is enabled by default and you should only disable it if you encounter issues with data compression (for example poinclouds not showing in the WebUI).
Use polling for data stream lets the WebUI control the rate at which data is sent (by polling the backend for new data). This is enabled by default to avoid buffering a huge amount of data in the WebUI if it is not able to receive and draw all the data that would be sent by the backend one per frame. You should only disable this option if you encounter issues with the polling (for example you can only get a single fixed pointcloud).
Layout selector
You can choose the interface layout you want to display. For now there are only 2 layouts available:
Tech Menu is the default layout for calibrating the system. You have access to all the settings needed to configure the system with sensors and outputs.
Simulation is the same layout as what is displaying in the standalone Augmenta Simulator. You can switch to it if you need to perform some data simulation, although there are already some simulation capabilities in the Tech Menulayout.
Changing the WebUI’s layout from the top bar
Resync button
If you lose synchronization with the server (some objects are out of date, the synchronization button is red, etc.), you can click on the "Resync" button to resynchronize the server with your interface.
Logger
Display the logger panel. This mirrors the content of the backend console and is handy if you need to check the logs when not directly having access to the desktop interface of the server.
Checking the backend logs in the WebUI through the logger panel

 Augmenta Pleiades (advanced interface)
  Augmenta server access